Live version 12.1 just entered public beta and brings more than you’d expect: major Push additions, new ways to work faster with keyboards (and screen readers), a new Drum Sampler and tracking and pitch correction facilities, and more. Oh, and they finally fixed (my) most annoying omission in Live. Here’s what’s new in Live (Push is covered separately).
I’m still on Live 12 stable, so this isn’t a review, but generally by the time the Live releases go into public beta, they’re worth checking out. (Just don’t use them for live performances or other really critical stuff.)
New and updated devices
Drum Sampler
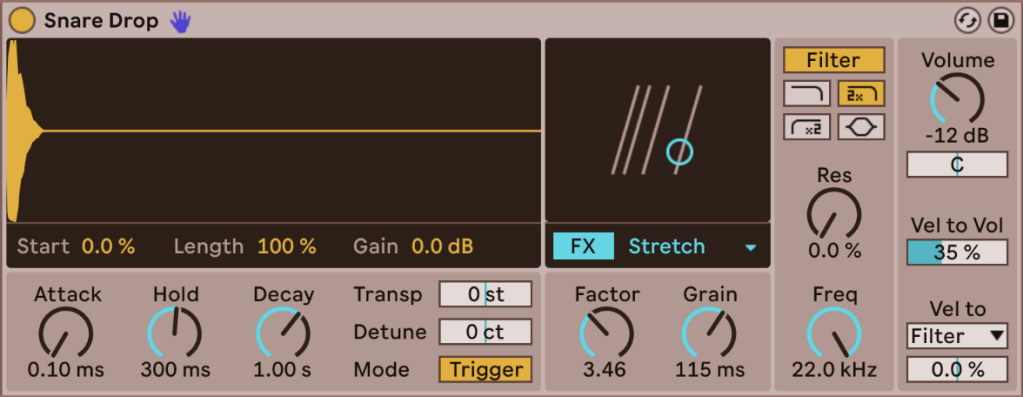
Well, this was unexpected. Drum Sampler is a new tool created for playing one-shot samples in Drum Racks. Wait – isn’t that easier? Well, yes, but Simpler has a very peculiar way of working. This gives you a bit more of what you might like from a single player, and some unique, very Ableton twists. I fully expect to be mixing Simpler and Drum Sampler (although it’s a little confusing that they didn’t call this one Drum Easierbut hey).
What is there:
- One-off with start and length
- Attack/Sustain/Delay amplitude envelope (which suits the task better)
- Transpose and detune
- A compact filter section with four filters: 12 and 24dB lowpass, 12dB highpass and a simplified single-band parametric EQ (which you can dial up and use as a notch)
- Playing the FX section: frequency and ring modulation, suboscillator and noise layering, punching and degradation, stretching, etc.
- Assignable speed (or of course use it to modulate the volume)
What’s not (as near as I can tell): looping. So they really only mean disposable; for anything loopy you’ll need Simpler (or Sampler, etc.).
And really, look at the picture. I love Simpler, but after more than 20 years I still find it confusing to look at – it’s one of the cleanest user interfaces out there. The other modes (Classic, 1-Shot, and Slice) mostly made it more inconsistent, and the 1-Shot mode really felt like it lacked a lot of controls. The Simpler Classic and Slice modes are likely to remain your favorite choice for traditional simpler sound design and slicing. But it really fills a big hole.
This new FX module is reminiscent of the oscillator types in Meld – put lots of goodies in the drop-down menu so you can explore at your leisure, have fun and not get overwhelmed.
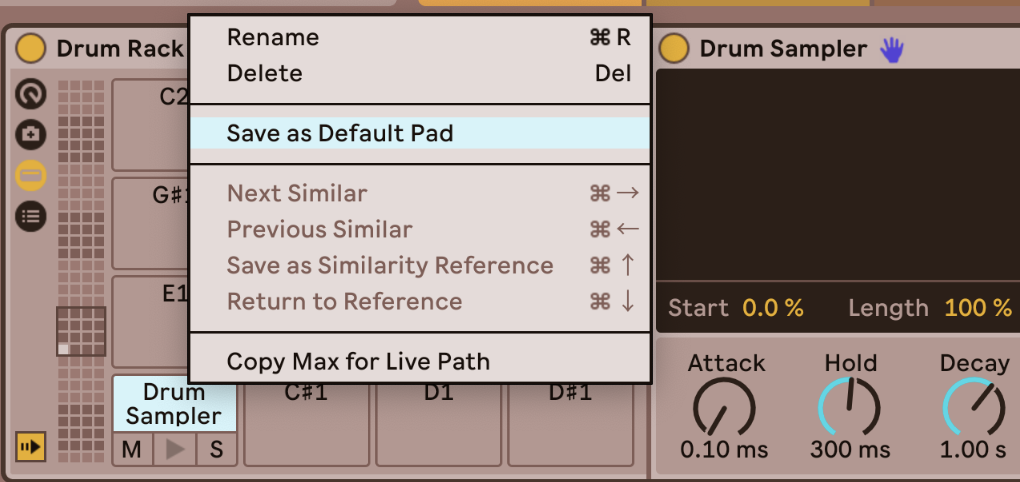
If you want, you can manually swap the Drum Rack slots for the Drum Sampler – or even set it as your new default. (And now how it looks with them No add, but what I would like is Slice to MIDI presets for the Drum Sampler. That would be great, of course – fingers crossed!)
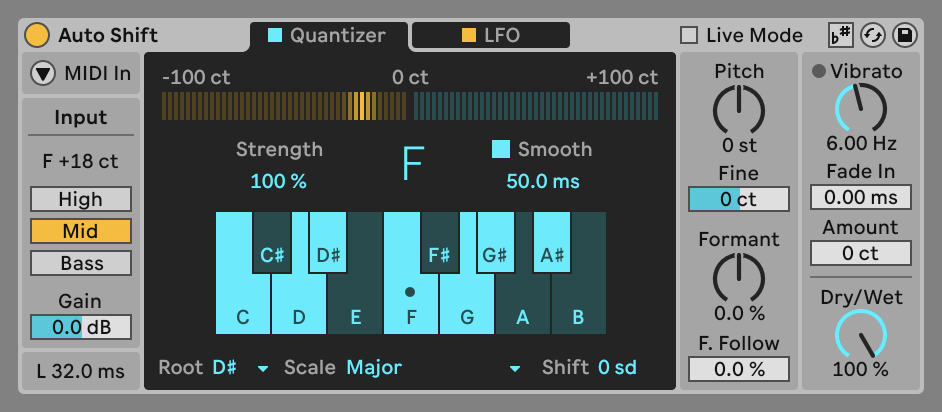
Auto Shift
Auto Shift is an important addition to Live. As I wrote yesterday, pitch correction can be used in all sorts of creative ways, not just when you’re channeling Cher. (And it’s also connected to a lot of classic vocal transformers, not just AutoTune.) It also has two modulation sources: one LFO dedicated to vibrato and one assignable. And it has MIDI and MPE support.
The important thing here is that it will be the first device to allow voice input with built-in and user-defined scales and Live tuning. (On the second point, it supports MPE modulation in MIDI mode, so select MIDI mode to support tuning – both the current Live tuning defaults and any he played intonation via the MPE controller.)
Since I waxed lyrical about hard tuning with formant shift yesterday, here’s another one. So at the DSP level, there are several different ways to implement pitch correction. I’ve described Baby Audio’s Humanoid in terms of “voicing” (no pun intended) because how you map parameters like smoothing can drastically affect the sound.
My hope remains this: I’d like to see MPE support in plugins like Humanoid, and then we’ll have a range of tuners that we can use on Live and use with both MPE and applied tunings. Most of the world uses tunings other than 12-TET and modes other than “Church Modes”; there is no reason why these should be the default values.
Updated devices
Your existing devices will also love it here:
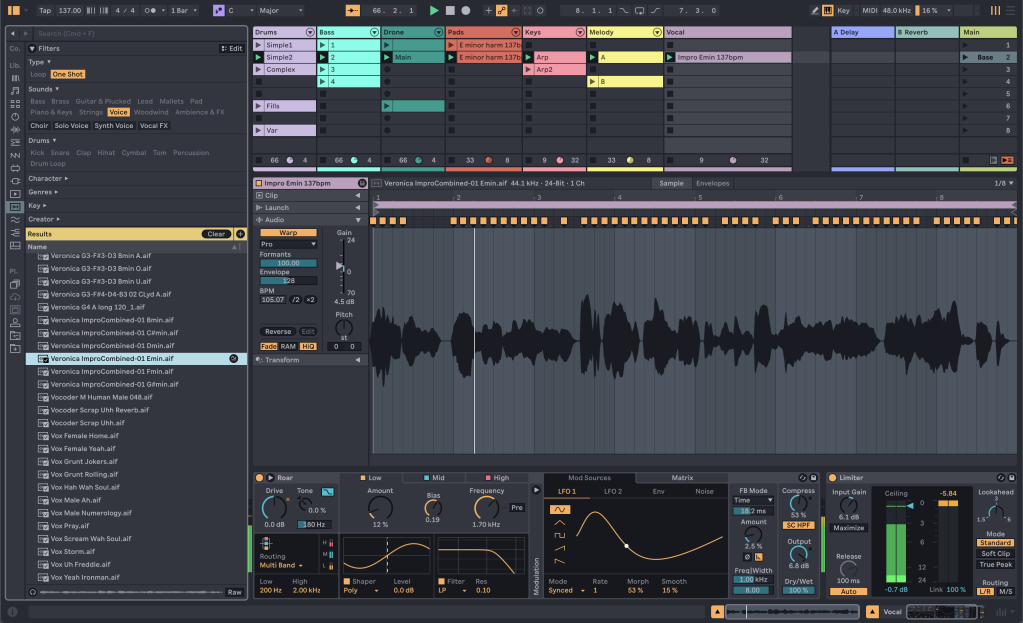
Limiter it gets a complete overhaul (sound and look) with smoother release envelopes, better metering, center/side routing, and continuous gain reduction circuitry. There are also new Soft Clip and True Peak modes. (If you’re really into that sort of thing, check out my recent Arturia BUS Peak review as well.)
Saturator has been completely redesigned. It now has a new Bass Enhancer shaping curve (for your 808 kicks and bass lines), Hard Clipping, a pre-shaped EQ display after the UI extension, and more. Considering how many people I see asking questions about Drum Buss to get some of this, I’m guessing it’s going to be a big hit.
Workflow improvements
Keyboard (and screen reader) improvements.
Now you can finally turn on automation and modulation in Arrange and envelopes in clips using the keyboard. Basically, you can use ENTER to create and select breakpoints and up/down/left/right to move things around, among other shortcuts. No more endless mousing. Check out the release notes to brush it up.
Accessibility improvements tend to impact everyone—so it’s sure to be accompanied by screen reader feedback when you’re working with automation on the layout timeline. Screen reader users, I’d love to hear from you – any tips or complaints.
MIDI chopping
Now you can chop MIDI in new ways:
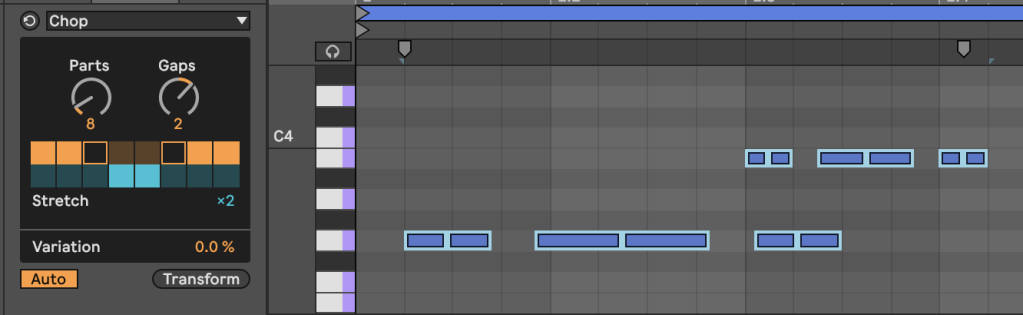
New way: Chop MIDI Transformation. (that’s the MIDI transform you see now when editing – Transform tab / Chop MIDI tool).
The old but now improved way: Note chopping operations in the MIDI Note Editor. Again, this is in the release notes, but since it’s more consistent with the way other parts of Live work, some of you will suddenly notice that chopping works as expected – CTRL-E for grid chopping, hold ctrl-/cmd- and click to chop and click and drag up and down to chop more or less. Brilliant. (See the release notes for more details.)
More new MIDI tools for MPE
In this release, you’ll also get two additional MIDI Tool plugins specific to MPE – in addition to what you’ve been preparing with Max for Live, advanced patcher users! (Let me know!)
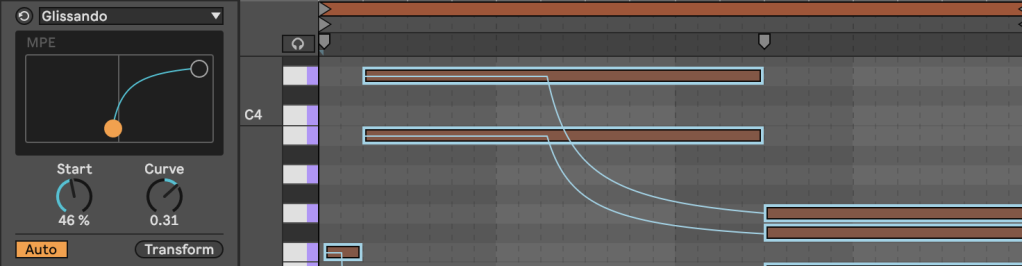
Glissando links and pitch bends, as the name suggests.
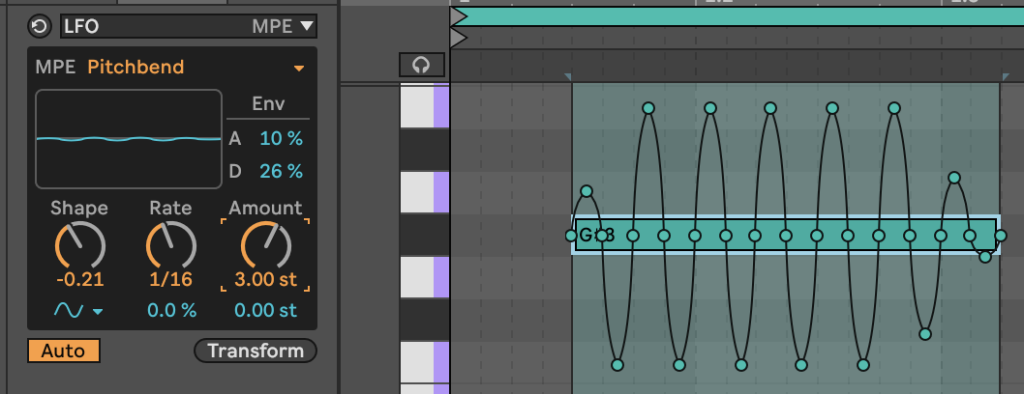
LFO is really cool – it creates an oscillating envelope for the MPE parameters of the note – like Pitch Bend, Pressure or Slide. So now if you have any MPE tool loaded and you’re on a plane or bus and you don’t have your full Osmose controller handy, you can type in some MPE from your desk! (Yeah, I’m crazy enough to do that.)
Tuning Systems is about to take off
I’ve made no secret of my love for supporting Ableton’s tuning system. Support is coming to DAWs gradually, in Stacks, Tuner and Auto Shift in this build, plus anything that supports MPE pitch information (from Ableton or whoever) will work with this more or less automatically. (You may need to adjust the pitch bend range to achieve the intended results.)
There are two big improvements:
Tuning and scales, sort of. New in version 12.1, Ableton adds support for any tuning system with 12 notes per octave to work with Live scales. It’s not a fully integrated Scale/Tuning mode – that would have to incorporate Scale support for additional numbers of scales per octave, before we even start talking about tuning systems that don’t repeat across octaves. But it’s a good start and should mean something like Pelog or Slendro will work immediately. (In Live 12 and earlier, these Indonesian systems were remapped to foreign 12-TET.)
Max for Live API support. This is the big one – you can set up the debug system, edit the debug, access the debug, and convert to mtof messages. This opens up Max support for Live Device and I believe also tuning-aware MIDI Tools and Transformations. More on that soon.
More improvements that will make you scream “finally!”
Here’s a lot more:
- Sound clips now support Scale Awareness – you set the scale on the clip and it is forwarded to the next device on the chain. This means you can scale after the clip. (The Clip pitch parameter is No affected by scales or tuning—it’s still a 12-TET semitone.)
- Auto Pitch is now the first scale-aware sound effect
- Apply grooves immediately, including hot-swapping, loading new MIDI clips (there’s a switch), and when opening kits. This means you can easily set the groove in any set from the default 0% to whatever you want – finally like other instruments.
- Back History shows a list. YES.
- He is here Full height browser choice. YES, MY EYES. (pictured above)
- You can automatic tagging of plugins and user content. Without handmade, the marks will magically appear. COLD.
- Fold the nested labels. Yeah, it made it difficult to navigate in the browser. Solid.
- The envelope tracker has a side chain.
- A tool for MIDI stacks now he manages both own chords and Tuning systems!
- Tuner works with tuning systems. (that already worked on the amazing Ableton tuning, so – cool! Practice singing those maqams, all of you, really!)
And my personal favorite: you can MIDI map (and keyboard map) MIDI Tools. CLARO QUE SÍ
Oh my god, they finally fixed MIDI CC learn! Rejoice, for our benevolent development gods have blessed us!
I’m sorry, leave everything. There’s never been a feature that annoyed me more than this in Ableton Live – except maybe in the 1.x release cycle when you couldn’t initially turn off looping and warping.
It’s always easy to request something as a user, but some obvious flaws – especially early functionality – can be really hard to fix in practice. That’s probably how it is here. Here is the history, spanning over 20 years:
Ableton introduces Live with MIDI assignable controls and MIDI learning. This may were a launch feature in version 1.0; the user manual describes the versions as “all”. It was certainly available in its current form in 2002-2003; see review 1.5 by Laura Pallanck MIXTURE or Chachi Jones – aka Donald Bell – for TapeOp’s Live 2 piece. (You can read my Live 1.x review on O’Grady’s PowerPage or the 2.0 beta announcement, although it’s fun, you had to wait until Live 2 to be able to use more than one MIDI controller at once! Byline Jason O’ Grady, but that’s my writing.)
Live 1 – now: Learning MIDI CC allows only one parameter at a time. If your MIDI controller is sending two MIDI CCs at the same time, your solution is – wait, that’s not possible at all. (You can try to filter it with some other method, or generate the message manually and learn from it – since there’s no way to manually enter the CC either.)
More than two decades have passed. Nothing changes. I imagine that inside Schönhauser Allee, the question comes up in every release cycle. People probably write angry Post-It notes. The masters of SCRUMM are brought to their knees. No one can solve CC tasks. Lamentations can be heard from everyone feierabend. (Sorry Abletrons, I’ll let my imagination run wild!)
They finally fixed it in Live 12.1! Not this one quite the fix that some of us wanted seems like it should be in the MIDI assignment panel, not here. But I’ll take it. There is now a CC Control effect with a MIDI CC learn mode, so you can set the CC manually.
Here.
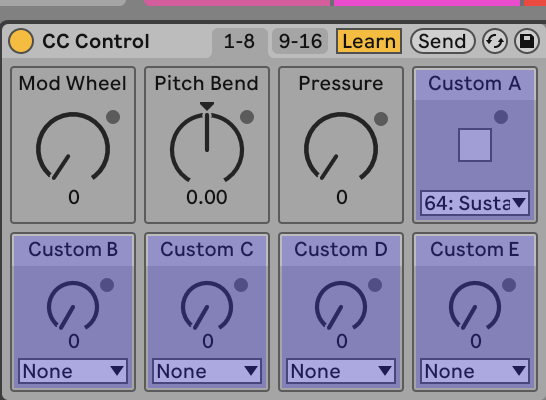
That’s the trick, at least for now.
All in all, this is a huge update. I can’t wait to try it out.
Ableton Live 12 Beta Release Notes
Live 12.1 adds Auto Shift, Drum Sampler and more – now in public beta
Join the beta